A Comprehensive Guide to Integrating Shopify with Make
Unlock the Full Potential of Your E-Commerce Operations Through Seamless Automation

Hello! I'm a passionate software engineer with hands-on experience in a variety of automation tools. My expertise lies in streamlining processes and boosting productivity through intelligent automation solutions.
In addition to my automation skills, I have a strong background in Python and Node.js, which I use to create robust backend and server-side applications. Whether it's developing complex systems or integrating cutting-edge technologies, I thrive on solving challenging problems and delivering efficient, scalable solutions.
Join me on this journey as I share insights, tutorials, and tips to help you harness the power of automation and enhance your technical skills. Let's revolutionize the way we work together!
Introduction
Integrating Shopify with Make (formerly Integromat) is a powerful way to streamline and automate your e-commerce operations. With this integration, you can manage various aspects of your Shopify store-such as orders, products, customers, and more-directly from the Make platform. This guide will introduce you to the process of connecting your Shopify store with Make, whether you choose to use the standard OAuth connection or create a custom app for enhanced functionality.
Prerequisites
Ensure you have the following:
A Shopify account. You can sign up at Shopify.
A Make account. You can sign up at Make.com.
Basic understanding of APIs and webhooks.
Shopify Modules in Make
With Shopify in Make, you can manage the orders, products, product variants, product images, collects, custom collections, customers, articles, pages, refunds, fulfillments, fulfillment orders, fulfillment services, inventories, abandoned checkouts, transations, discounts, metafields, payments, and themes in your Shopify account.
Refer to the Shopify API documentation for a list of available endpoints.
Connecting Shopify to Make
Shopify offers two types of connections:
Standard OAuth connection (displayed as Shopify in the Create connection dialog) - use this by default
Custom app (displayed as Shopify (custom or private apps)) - use this if the standard connection does not work
To connect your Shopify account to Make, follow these steps:
Connecting Shopify using the standard connection type
Use the Shopify connection type by default. If creating the connection causes errors, use the custom or private app connection type.
Insert a Shopify module into a scenario. Under Connection, click Add.
- The Create a Connection dialog appears.
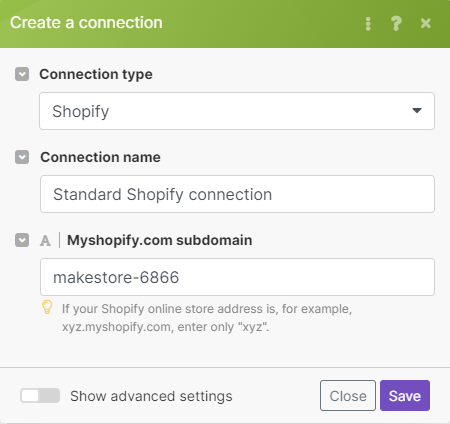
In the Connection type, select Shopify.
Type a Connection name.
Enter the Myshopify.com subdomain of your store.
- For example, if the URL of your store is
https://mystore.myshopify.com, the subdomain to enter in the connection dialog ismystore.
- For example, if the URL of your store is
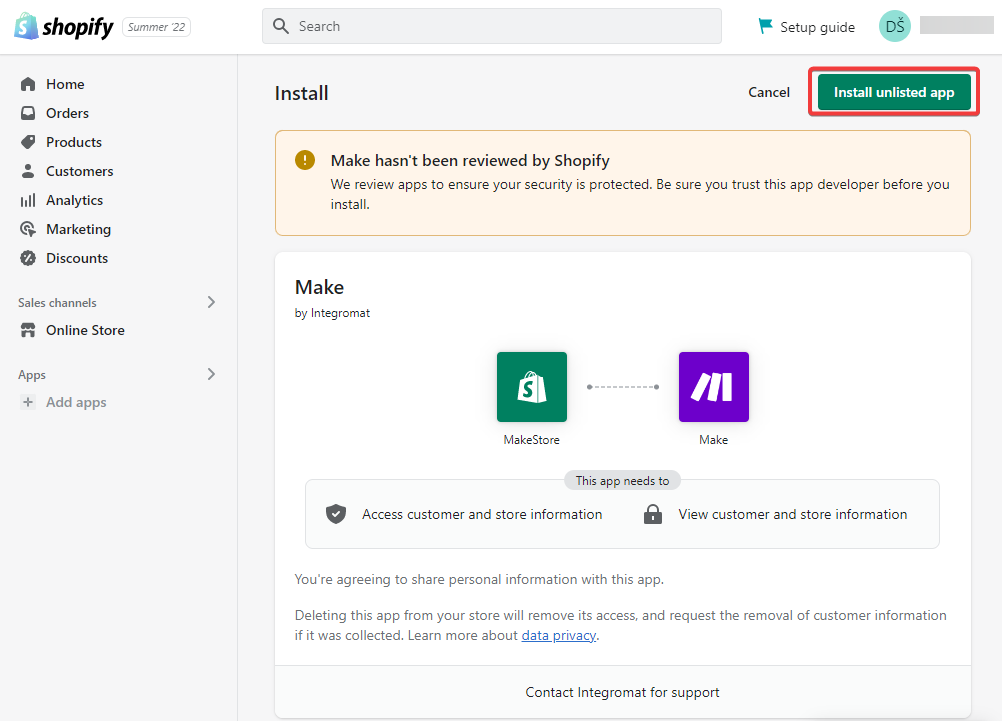
Click Save.
- The system opens Shopify in a new window. Shopify asks you to log in and install the Make app and approve its access to your store data.
In the Shopify Install dialog, review the privacy and per
missions details, and then click Install unlisted app.
Connecting Shopify using a Shopify private or custom app
Use the Shopify (custom or private app) connection type if the standard Shopify connection type does not work for you.
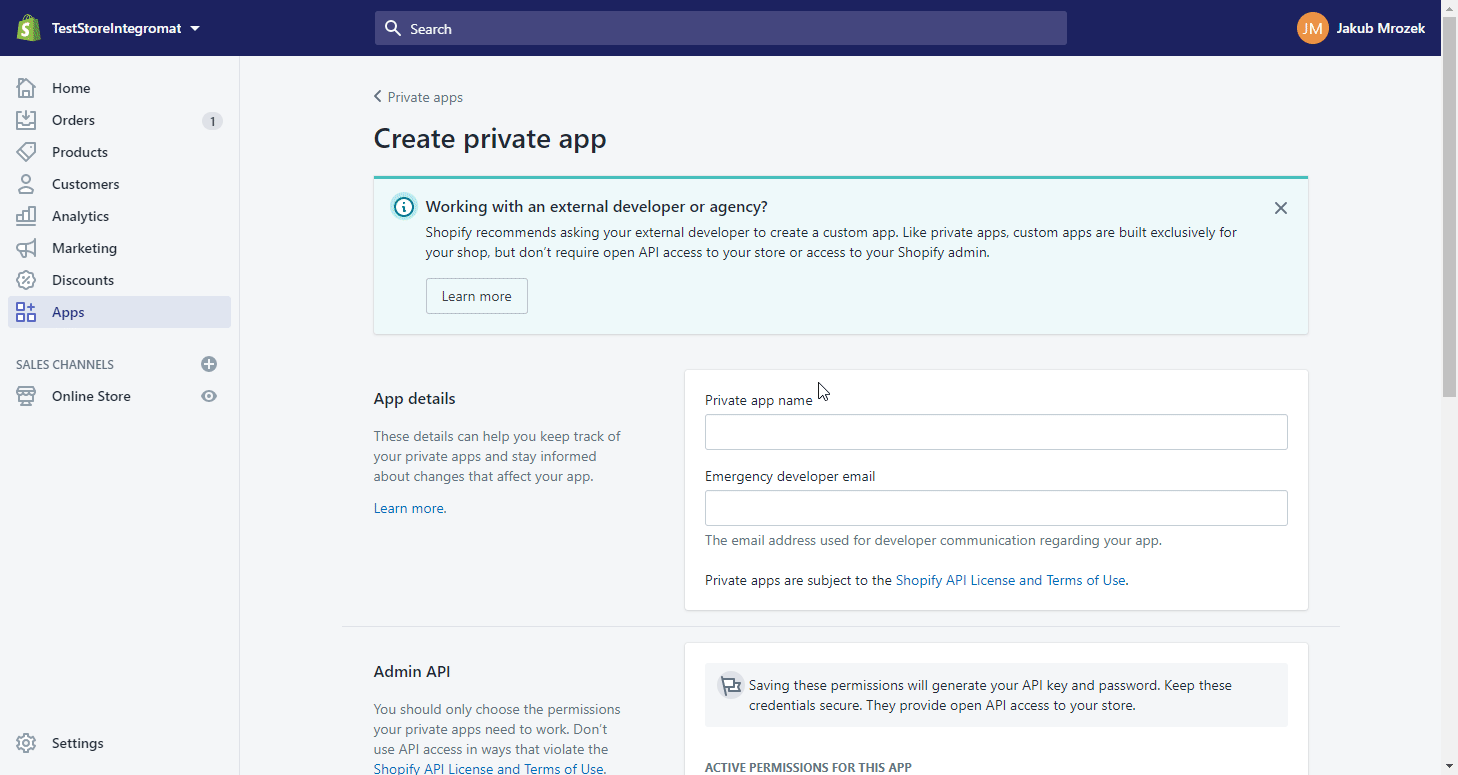
This connection type requires creating a custom app in your Shopify store.
Log in to your Shopify store, click Apps, then click App and sales channel settings.
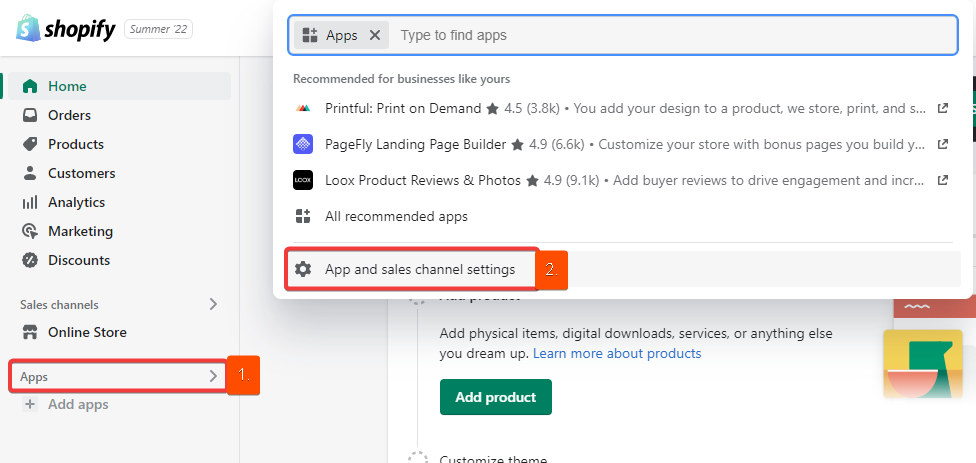
On the Apps and channels screen, click Develop apps.

Click Allow custom app development, then confirm this action again by clicking Allow custom app development on the next screen.
- This will allow you to create an API token that you will use when creating the connection in Make.
Click Create an app.
Type an App name, select an App developer, and click Create app.
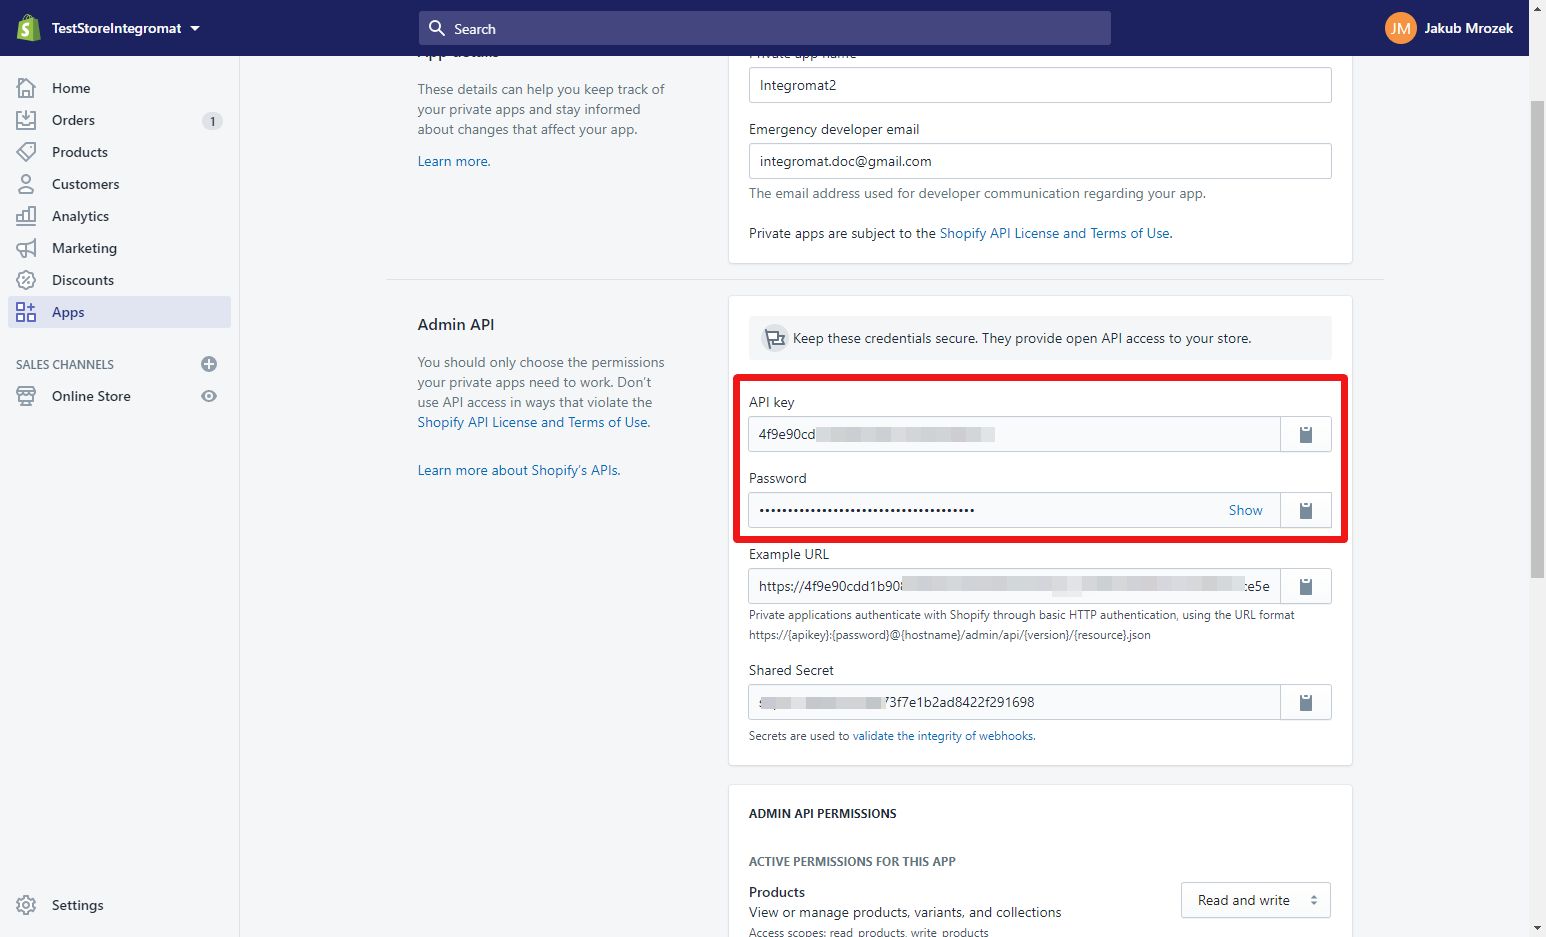
Click Configuration, then click Configure next to Admin API integration.
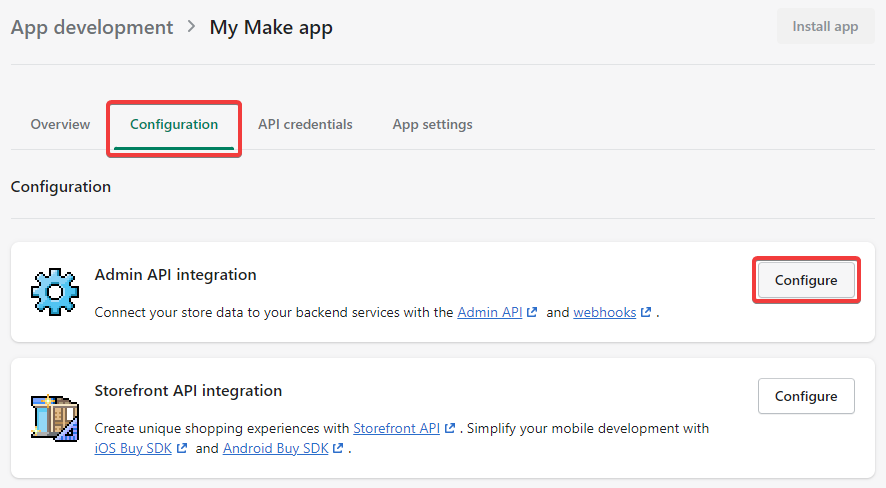
On the Admin API integration screen, select scopes (permissions) that represent the actions you will need Make to perform. Then click Save.
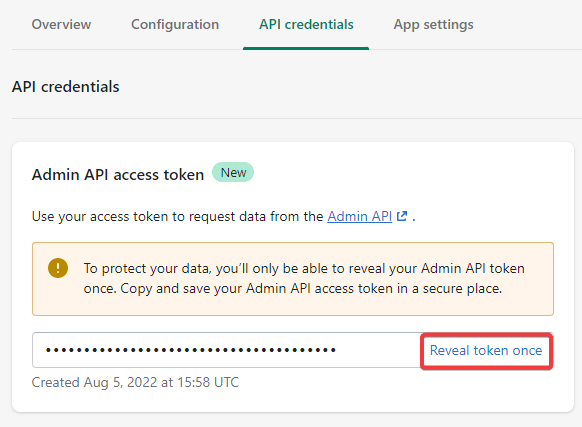
Switch to the API credentials tab and under Access tokens, click Install app. In the dialog that appears, confirm the action by clicking Install app.
- Shopify creates an Admin API access token. Click Reveal token once and copy the token. You will enter this token into Make in the next step.
In Make, add a Shopify module to a scenario. Under Connection, click Add, then fill in the required details shown in the following image.
Click Save.
Public App Connection
Use this to connect your Public App created in your Partner Dashboard.
To create an app:
From your Partner Dashboard, click Apps > Create app.
Provide an app name, URL, and Redirect URLs.
Click Create app. You are directed to your app's overview page, where you can view the API key and API secret that you will need for the module's connection configuration.
| Connection Type | Shopify (public apps). |
| Connection name | Enter the name of the connection. |
| Domain | Enter the name of your Shopify domain. If your Shopify store address is https://mystore.myshopify.com, enter "mystore". |
| Client ID | Enter the API key for the app, as defined in the Partner Dashboard. |
| Client Secret | Enter the API secret key for the app, as defined in the Partner Dashboard. |
| Scope | Specify needed scopes. If you requested both the read and write access scopes for a resource, then enter only for the write access scope. The read access scope is omitted because it’s implied by the write access scope. For example, if your request included scope=read_orders,write_orders, then check only for the write_orders scope. |
Private App Connection
To establish a private app connection, you need to create a private app to obtain the API Key and Password.
1. Log in to your Shopify administration.
2. Navigate to Apps > Manage private apps.
3. Click the Create new private app button().
4. Fill in the required fields, click Save, and Create App.
5. Find the generated API Key and Password in the Admin API section.
6. Go to Make, and open the Make an API Call module's Create a Connection dialog for the Shopify private app.
7. Enter the Domain (if your Shopify online store address is, for example, xyz.myshopify.com, enter only "xyz".) and API Key and Password provided in step 5 to the respective fields, and click the Continue button to establish the connection.
The connection has been established. You can set up the private app's Make an API Call module.
Conclusion
Integrating Shopify with Make enhances your e-commerce efficiency by automating tasks like order management and customer updates. Whether you use the standard OAuth connection or set up a custom app, you’ll streamline operations and save valuable time. Explore Make’s automation features to optimize your Shopify store’s performance and enjoy a more seamless workflow.

